Thursday, July 7, 2011

The King's Fave Salad

When I first met the King he was a vegetarian.  This meant that the main staples of his diet were cheese pizza and oreos.  He would occasionally eat Indian food to count vegetable samosas as a serving of vegetables.  He was also starting to come around to the concept of salads at that time, thanks to a place called Chop't where they chop everything in the salad into bite size pieces so that the king is able to elegantly eat a salad and not make a mess (something he avoids at all costs-when eating).

Upon visiting the royal family last week, my sister and I discussed the male diet and how they avoid fruits and vegetables as much as possible.  Why is that?  Maybe it's because they take too much time and effort to prepare?  Neither of us seemed to be able to answer that question.  I also discussed men's fruit-eating habits with my sister, where we came to the conclusion that the only "manly" fruits are apples, bananas, and orange juice (if that even counts as a fruit).

When it comes down to it, the King has come around to my way of eating-except on the fruit front.  But, I'll keep trying.  The following is a salad that we eat in our house at least twice a month during the summer months and the King has claimed he would eat it more often if I prepared it.      

I skip the lettuce cups, use store bought rotisserie chicken and make this into The King's Fave Salad.  

With asiago focaccia and a glass of wine, it was perfect for this humid 94 degree day.  No need to even turn on the oven!


Wednesday, July 6, 2011

Funfetti cake batter ice-cream

OH YES.  I DID.  Like many Americans, we celebrated the 4th with friends, food, and fireworks.  In coming up with the perfect dessert, I took into consideration the King's definition of a dessert.  I decided ice-cream would be good to cool everyone down in the sweltering heat.  Then I concluded that one of my favorite flavors of ice-cream is cake batter.  After that decision was made, I had to amp up the festive quotient.  It had to be red, white, and blue for the occasion.  Obvi. 
It went great with brownies which are also extremely American (*FUN FACT:  a cross between cake and a cookie, it became popular in the early twentieth century).
Funfetti Cake Batter Ice-Cream with Buttercream Frosting
* a combination of recipe 1 for the ice-cream and recipe 2 for the frosting


    Ingredients for the frosting:

    • 1/2 cup shortening, softened
    • 1/2 teaspoon vanilla extract
    • 2 cups powdered sugar, sifted
    • 4 Tablespoons heavy whipping cream
    • Gel Food Coloring (I clearly used red and blue)
    Ingredients for the ice-cream:

    • 1 cup whole milk, well chilled
    • 3/4 cup granulated sugar
    • 2 cups heavy cream, well chilled
    • 1 teaspoon pure vanilla extract
    • 2/3 cup Funfetti cake mix (too bad Wegmans ran out of the Stars and Stripes Funfetti)
    • Festive sprinkles if desired.
    Make the frosting:
    1.  Sift the powdered sugar and set it aside.
    2.  Mix the shortening in a bowl with paddle mixer attachment (or with a handheld mixer) until smooth.
    3.  Add in vanilla extract.
    4.  Slowly mix in the sifted powdered sugar until smooth.
    5.  Add in the whipping cream and mix on medium for a couple minutes.
    6.  Mix in desired food coloring.
    7.  Set frosting aside.
    Make the ice-cream:
    1.  Sift the funfetti mix into a small bowl and set aside.

    2.  In a medium bowl, whisk the milk and sugar until the sugar dissolves.
    3.  Whisk in the heavy cream and vanilla.
    4.  Whisk in the sifted funfetti mix until there are no lumps.
    5.   Pour mixture into the freezer bowl of your ice-cream maker and let it mix until thickened (15-20 minutes).  During the last minute mix in any desired festive sprinkles.

    Combining ice-cream and frosting into one delicious concoction:


    1.  Spread a layer of ice-cream in the bottom of your container. 
    2.  Place dollops of frosting on top and swirl the ice-cream and frosting together.
    3.  Repeat as many times as possible (I made it 4 times before I ran out of frosting).
    4.  Freeze for 2 hours to allow ice-cream to harden. 

    EAT IT!

    Monday, July 4, 2011

    Fruit Desserts for the Royal Family

    So last week I made a trip home to spend some time with my family! (I guess this blog makes them the royal family). The king had to work, so he came up for the weekend to celebrate our 1 year anniversary. It involved a B&B, wine tasting, and a lot of delicious food. He flew home on Sunday night and left me in the care of the royal family.

    My big request for eating with the royal family for the week is that we get to enjoy many fruit desserts-something the king does not approve of. If it doesn't incorporate chocolate or ice-cream, then it is not for him.

    We went to the berry farm and picked up some fresh strawberries, so we got to indulge in these little beauties:
    Later in the week, the queen mother, myself, and my sister hit up the public market in our town. It is endless row stalls filled with fresh fruits and vegetables. We strolled past all of the stalls first to check for the best prices and the best produce. Turns out it is all very similarly priced and everything looked amazing. The queen mother picked up some lemons, strawberries, raspberries, tomatoes, mushrooms, oranges, basil, mint, olives, and cheese. And a Creeping Charlie plant that looks like this for my sister:
    Long story short, I had a ton of fruit to work with. So I made my family a pitcher of that awesome sangria (and I actually remembered to take some pictures of it!):


    And then I made these amazing Raspberry Crumb Bars...beautiful and delicious:


    Raspberry Crumb Bars 
    •(inspired by Smitten Kitchen’s recipe)
    • 1 cup white sugar
    • 1 teaspoon baking powder
    • 3 cups all-purpose flour
    • 1 cup cold butter (2 sticks or 8 ounces)
    • 1 egg
    • 1/4 teaspoon salt
    • Zest and juice of one lemon
    • 3 cups fresh raspberries
    • 1/2 cup white sugar
    • 4 additional teaspoons flour
    1. Preheat the oven to 375 degrees.

    2. Line 9x13 inch pan with foil (for easy cleanup) and grease it.

    3. In a medium bowl, mix together 1 cup sugar, 3 cups flour, and baking powder. Mix in salt and lemon zest. Use a fork to blend in the butter and egg. Dough will be crumbly.

    4. Pat half of the dough into the prepared pan.

    5. In another bowl, stir together the sugar, the 4 teaspoons of flour and lemon juice. Gently mix in the raspberries.

    6. Sprinkle the raspberry mixture evenly over the crust.

    7. Crumble remaining dough over the berry layer.

    8. Bake in preheated oven for 45 minutes, or until top is slightly brown. Cool completely before cutting into squares.

    9. Enjoy!

    P.S.  I realize there is still a lot of space between some of the pictures and text, but I give up : )

    P.P.S.  I discovered the app "Instagram" on my phone this week, which is why these pictures look so awesome.

    Thursday, June 16, 2011

    A dip into my thoughts...

    I like rainy days.

    I fear ceiling fans.

    I lived in Kansas for 2 years.

    I am a Wegman-iac.

    My favorite number is 6.

    I have never seen Star Wars.

    I won a prom dress my senior year of high school.

    Daisies are my favorite flower.

    I met the King playing kickball.

    I have a weakness for buffalo chicken anything.

    Speaking of buffalo chicken!
    Buffalo Chicken Dip
    • 1 brick cream cheese
    • 2 pieces cooked shredded chicken
    • ½ c Frank’s red hot (or wing sauce for thickness)
    • ½ c. blue cheese dressing
    • 8 oz. shredded Monterey Jack cheese
    1. Layer the above in a pan.
    2. Cook at 350° for 20 minutes and stir.
    3. Tortilla chips, red peppers, and carrots make great accompaniments!

    Monday, June 13, 2011

    I got beef.

    I got beef.  Flank steak to be exact.  And I wanted to grill it.

    I made a honey-lime marinade and I wanted to take a bath in it.  I dipped pita chips in it while the king watched, and then when his back was turned, I shamelessly used my fingers to scrape and lick the bowl.  This is probably not queen behavior so shhh don't tell...I wouldn't want to lose my crown.

    So try this marinade.  Chicken, pork, veggies, or straight out of the bowl, it is highly recommended.

    However, I do not think that I used the marinade to it's full potential.  Our grilled medium-well flank steak came out tough, and we couldn't even taste the heavenly marinade on the finished product!  I felt jipped.  And that is why I've got beef.

    I'm still rather new at grilling (2 weeks new in fact).  Did I use the wrong cut of meat?  Was I supposed to baste it on the grill?  Was medium-well too long?  Please help!  If you have any tips for better beef grilling, I'm all ears.


     Honey-Lime Marinade/Dressing
    *adapted slightly from flank steak tacos with cilantro

    • Juice of 1 lime
    • 2 garlic cloves, pressed
    • A bunch of fresh cilantro
    • 2 teaspoons of honey
    • 1/2 teaspoon of cumin
    • 1/2 teaspoon of ancho-chile powder
    • 1/2 teaspoon of red-pepper flakes
    • 1/3 cup of extra virgin olive oil
    • salt and pepper to taste
    1. Combine lime juice, garlic, and cilantro in a small food processor and pulse until blended.
    2. Add the rest of the ingredients and blend.
    3. Marinate/dress a salad/slurp it out of the bowl!

    Saturday, June 11, 2011

    Dinner Night

    Not long after I started dating the King, I met his "dinner night" friends.  Every week there are anywhere from 5-8 of us and we each take turns cooking.  Occasionally, we go out to eat too.  Everyone tends to go all out on their dinner night.  This means I am guaranteed one delicious meal (with side dishes and dessert!) once a week. As if this could not get any better, the company is excellent as well.  We discuss everything from the latest Bachelorette (the guys feign interest in this subject, but typically get involved anyway) to whether or not a top sheet is necessary (NECESSARY!).

    It gives me an excuse to set the table like this:

    It's more impressive when there is food on the plates and the glasses are filled.  Unfortunately, I was too busy enjoying the company to take a picture of that...

    I put on some Mongo Santamaria to set the latin-esque mood and placed a pitcher of this on the table:
    That is really a picture of some of the leftover fruit.  Again, I forgot to get a picture of the actual sangria!  So this is my leftover liquor-soaked-fruit in a glass of seltzer water.  Still yummy, even wine-less.  The original wine-filled version was light and fruity.  

    While I was busy setting a mood, the King was downstairs firing up the grill.  This meal was extremely well received and looked a little something like this (only a little though, as these are the leftovers):
    Here's a close-up:
    It's grilled mojo pork tenderloin with salsa verde on a bed of black beans and rice served with grilled veggies on the side.  Salsa verde really MADE this dish.  To end this meal right, I served the rest of my Brownie Chunk and Chocolate Chip Cookies with vanilla ice-cream.

    I really enjoyed this meal because it was delicious, AND I didn't spend the whole night in the kitchen!

    White Sangria
    • 1/3 cup of brandy
    • 1/3 cup of peach schnapps
    • 1 1/2 Tablespoons of sugar
    • 2 (750 milliliters) Rioja white wine, chilled
    • 1 lemon thinly sliced
    • 1 small navel orange, quartered and sliced up
    • 1 green apple, quartered and sliced up
    • 1 ripe mango, diced
    • 1 (12 oz.) bottle of sparkling water
    1.  Combine the sugar, brandy, and peach schnapps in a pitcher and stir to mix in the sugar.

    2.  Add both bottles of wine and the fruit and chill 2 hours until chilled.

    3.  Add the sparkling water just before serving.

    Mojo Marinade 
    (I put this on the veggies, but it would work to make a pork tenderloin mojo too)
    • Pinch of oregano
    • Pinch of red pepper flakes
    • 2 garlic cloves, pressed
    • 1/3 cup extra virgin olive oil
    • Juice of 1 lime
    • Juice of 1 orange
    • Soy sauce
    • Brown sugar
    1.  Mix all ingredients together and marinate away (veggies, pork, fish, etc.!).

    Monday, June 6, 2011

    For the Love of Vegetables...

    I am not the hugest fan of vegetables.  My mom (aka The Queen Mother) can attest to this.  Like any good mom, she served balanced meals with lots of green vegetables.  My brother, sister and I had to eat what was served.  If we did not, we were not allowed to get up from the table and we were most certainly not allowed to have dessert, or even a snack. 

    Due to my disdain for anything green, this resulted in many an argument.  The worst punishment of all time was being banned from watching "Full House" unless I finished my vegetables!  It was torture.  WHAT!?  No Stephanie Tanner?!  What was I going to talk about with my friends the next day?  Certainly not the cold lump of something green on my plate.  Somehow, I survived that ordeal-the scurvy from my lack of vegetable eating, a missed episode chalk full of Tanner family values, and I still love the Queen Mother. 

    But here's the shocker...I now actually enjoy eating my vegetables...most of the time.  Especially this dish.  Please ignore that it is contains butter and cheese which are capable of making any dish taste good.  It is still me eating vegetables- a miracle.  As far as I know, it was created by the Queen Mother herself and has quickly found it's way into my heart (and is currently in my belly).  I suggest it also find it's way into your belly.

    Here is the line up (the lemons are decoration...and plastic):
    Layer all of the ingredients in an oven-proof dish:
     Top with cheese:
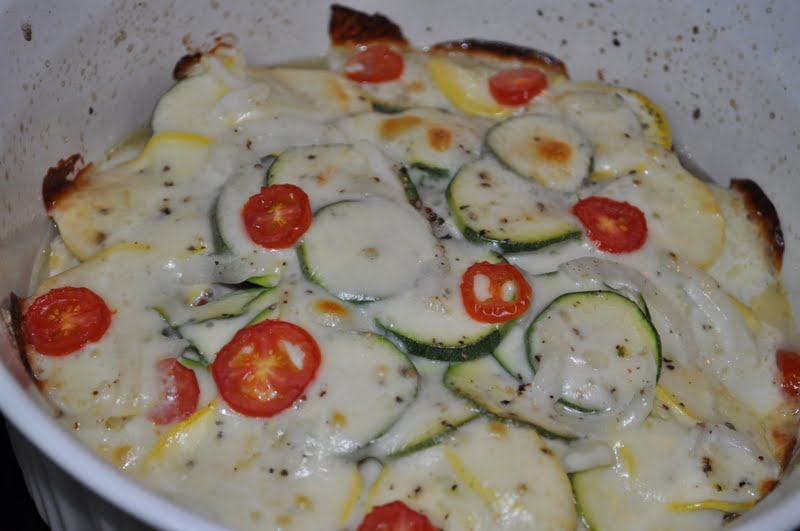
     Bake.  And this is what it looks like when it comes out of the oven:

    The Queen Mother's Zucchini Casserole:
    • Zucchini (I went with 3 green, 2 yellow)
    • 1/2 an onion
    • 1 tomato sliced (I used grape tomatoes because I had them)
    • 1/2 stick of butter (cut into tiny pieces)
    • Cheese (I like provolone, but really any cheese will do)
    • Salt and Pepper
    1.  Pre-heat oven to 375 degrees.  Spray your oven-proof dish with non-stick spray.

    2.  Layer zucchini, tomatoes, onion, some tiny pats of butter, salt and pepper.  Top it off with some of the cheese.  Continue layering (and remember it will sink down as it cooks so the more layers the better!).

    3.  Top with extra cheese and cover the dish in foil.

    4.  Cook until the zucchini is tender.  Remove the foil and allow to cook 15 minutes longer to allow the cheese to get nice and crispy.

    5.  Enjoy!